

5 considerations for running dental emergency drills

A drill that follows a script can still leave gaps in your team’s response. Knowing how to run mock emergency drills in a dental practice means testing how people respond when a patient’s condition changes, equipment must be retrieved and clear communication matters.
It’s sensible to want staff to feel prepared, not simply familiar with a procedure on paper. A useful mock drill gives your team a controlled way to practise its response, spot weaknesses and discuss what to improve next time.
This article explains how to build realistic scenarios, assign and rotate team roles, and include different patients, staffing situations and emergencies. You’ll also learn what to record after each drill so the lessons can inform future practice and keep your emergency response plan relevant.
Key Takeaways
- Build scenarios around realistic changes in a patient’s condition and practise with the equipment your team would use in an emergency.
- Give every team member a clear role, then rotate responsibilities so the response does not depend on one person.
- Include varied situations, such as a temporary staff member, reduced staffing or an emergency involving a paediatric patient.
- Record who took part, what the team practised and what needs improvement, then use those notes to shape future training.
- Debrief after each drill to recognise effective actions and agree practical changes to your emergency response plan.
1. What makes a useful dental emergency scenario?
A useful scenario tests a specific action, not just whether you can describe a routine procedure. For example, simulate a patient becoming unresponsive during a dental examination. Recognise the change, call for help and coordinate the response. Add a practical challenge, such as placing the emergency drug kit somewhere less familiar, to see whether you can still retrieve it promptly.
Use the equipment you would reach for during a medical emergency. Include your practice’s emergency drug kit, AED, oxygen and airway management equipment where available. Practise locating items, opening storage and identifying what is needed. Keep the scenario controlled, and make clear which items are training props rather than equipment for patient use.
Test equipment retrieval as part of the drill. Ask one colleague to fetch the AED while another retrieves the emergency drug kit. Check that each person knows where the items are and can return promptly without leaving the simulated patient unattended. If the oxygen cylinder is stored separately, include that route too. Record delays or confusion as practical gaps to address.
Use your practice’s real layout and equipment rather than a classroom substitute. A drill in the treatment room can reveal that a cabinet is obstructed or a label is difficult to read. Rehearse moving equipment through the corridor to reception if the scenario begins there. Keep the exercise safe: don’t administer medicines or activate equipment in a way that disrupts clinical care.
Expired emergency drugs or equipment aren’t ready for use. Before the drill, check expiry dates and visible condition through your practice’s normal checking process. If you find an expired item, remove it from the exercise and follow your practice’s replacement process. Use a clearly marked training substitute to practise retrieval without relying on out-of-date stock.
Make your scenario specific enough to prompt decisions. For suspected anaphylaxis, practise recognising a changing condition, locating the relevant emergency medicines and equipment, and communicating clearly. Don’t make the drill a memory test alone. Add a realistic interruption, such as a call from reception, to see whether you can keep the response coordinated.
Before starting, brief observers on what to watch: recognition, equipment access, safe handling and clear communication. Keep the simulated emergency drug kit in its usual location, then return all training items afterwards. A useful scenario tests real actions and identifies a change the practice can make.
2. Assigning team roles and responsibilities
Give everyone in your practice a defined task before a drill starts. Clear allocation helps prevent duplicated actions, missed steps and uncertainty about who is coordinating the response. Name one person to lead, then assign support roles that match the scenario and each person’s responsibilities. The lead should coordinate the response, give clear instructions and reassess what support is needed as the situation develops.
For a simulated collapse, direct one colleague to support the patient while another follows your practice protocol. Ask someone else to retrieve emergency equipment, and assign a colleague to make the simulated call for help. Choose another person to guide responders from the entrance to the treatment room. These tasks create a practical sequence to rehearse instead of leaving everyone to decide what to do at once.
Make each task specific. “Help with the response” is less useful than “bring the emergency drug kit” or “meet responders at reception”. Ask the person making the simulated call to explain the location, the patient’s condition and the actions already taken. Direct the colleague beside the patient to relay changes, including whether the airway appears clear and whether the patient responds.
Include support tasks that can be overlooked during a busy response. Ask one colleague to keep the route to the treatment room clear, and another to note key events for the debrief. If the drill begins in reception, ask the receptionist to alert clinical staff and manage the immediate surroundings. Give each person a brief instruction by name.
Prepare role cards or a simple prompt sheet based on your dental emergency response plan. Use consistent role names during briefings and drills so staff recognise them quickly. Don’t assign a clinical action to someone who isn’t prepared for it. Match each task to the person’s training and your practice procedure.
Rotate roles in later exercises. Ask a receptionist to practise making the simulated call while a dental nurse retrieves equipment. This helps reveal whether the response relies too heavily on one experienced colleague. It also prepares the team for an absent member, a temporary staffing change or an emergency in a different location.
After the scenario, ask each colleague what information or support they needed. Record specific gaps, such as uncertainty about who should make the call or monitor the patient. Use those findings to clarify responsibilities before your next drill. A focused review of emergency response training can help you practise coordinated actions and airway-related responsibilities.
3. Including temporary staff, paediatric patients and sedation scenarios
Vary the people and circumstances in each exercise. Test the response when your usual clinical lead is absent, staffing is reduced or a temporary colleague joins the team. Brief the temporary colleague on the exercise boundaries, but don’t reveal every prompt. Observe whether they can identify who is coordinating, follow instructions and raise concerns without relying on routines they haven’t practised.
Include a paediatric scenario by asking one colleague to role-play a child and another to act as the accompanying adult. Practise explaining actions calmly, maintaining privacy and assigning someone to communicate with the adult. Assess whether staff recognise a change in the child’s condition and adapt their response, rather than automatically following an adult-focused routine.
For a sedation scenario, introduce a change during or after treatment, such as the patient becoming less responsive. Stop treatment and follow your practice’s emergency response plan. Test whether staff can communicate their observations, involve the appropriate clinical lead and retrieve the equipment identified by the plan. Keep medicines and procedures simulated and controlled. Don’t administer drugs as part of the exercise.
Use the patient’s record as a prompt for prevention and response. Before the simulated appointment, review relevant information, including recorded medical history or previous concerns. Then introduce a new symptom or unexpected response. Observe whether staff pause treatment, assess the patient’s condition and share relevant details with colleagues. Record any difficulty accessing or interpreting the information.
Patient distress can arise before a medical emergency develops. For example, ask the role-player to say they feel unwell, then change their responses as the exercise progresses. Practise noticing the change, speaking directly to the patient and communicating observations clearly. Assess recognition and timely action, rather than expecting colleagues to guess a diagnosis from limited cues.
For a seizure scenario, stop dental treatment immediately. Practise moving sharp instruments away from the patient’s mouth and placing soft objects around their head to help prevent injury. Once convulsions subside, assess airway, breathing and circulation, then administer oxygen via a mask. Include monitoring vital signs and preparing an account of the event’s sequence and observed symptoms.
After each exercise, compare actions with the planned response. Record whether staff understood their roles, communicated clearly with the accompanying adult and recognised sedation-related changes. Use these observations to identify practical learning needs and shape the next drill.
4. Emergency training logs and documentation
For CQC inspection readiness, keep an organised record of emergency procedures, staff training and drill reviews. These records help show how you practise the response and address gaps. CQC expectations depend on the service being assessed, so a drill log should not replace a suitable emergency plan.
Use one training log for each drill. Record its date, scenario, participating staff and the roles they practised. Add observations about what went well, where the response slowed and which actions need follow-up. For example, note that a team member could not locate the emergency drug kit, then record the agreed action to clarify its location.
Make each follow-up entry specific. Name the action, the person responsible and its completion status. At the next review, revisit any unresolved point and record whether the change addressed it. Keep attendance records alongside the drill notes so you can identify who took part and who needs an opportunity to practise.
Plan ongoing emergency training and review it monthly. Use each review to choose a practical focus, such as recognising a patient’s changing condition, communicating observations or locating equipment. Review your emergency skills at least annually, and preferably more often. Monthly records can show how practice continues between formal skills reviews.
Give new team members emergency training as part of their introduction to practice procedures. Record the training and update the file when roles or relevant learning change. If a temporary staff member joins a drill, note their participation and any further briefing needed. Keep records current, accessible to appropriate staff and consistent with the practice’s documentation process.
Basic life support matters because you should have the training and ability to perform basic life support techniques. Record relevant training and when it took place, then plan opportunities to refresh practical skills. During a drill, observe whether you can begin the response, communicate clearly and follow practice procedures. Distinguish observed performance from assumptions about a person’s competence.
Use the debrief to turn observations into learning, not blame. Record the sequence of key events, decisions made and any change agreed for the dental emergency response plan. For example, if you were unsure who should call for help, clarify the role and include it in a future exercise. Review the log during the monthly training discussion, and close actions only when you have addressed them.
A clear record links training, participation and improvement. Keep the process simple enough for you to complete after each exercise while capturing the details needed to plan the next review.
5. Mock emergency drills
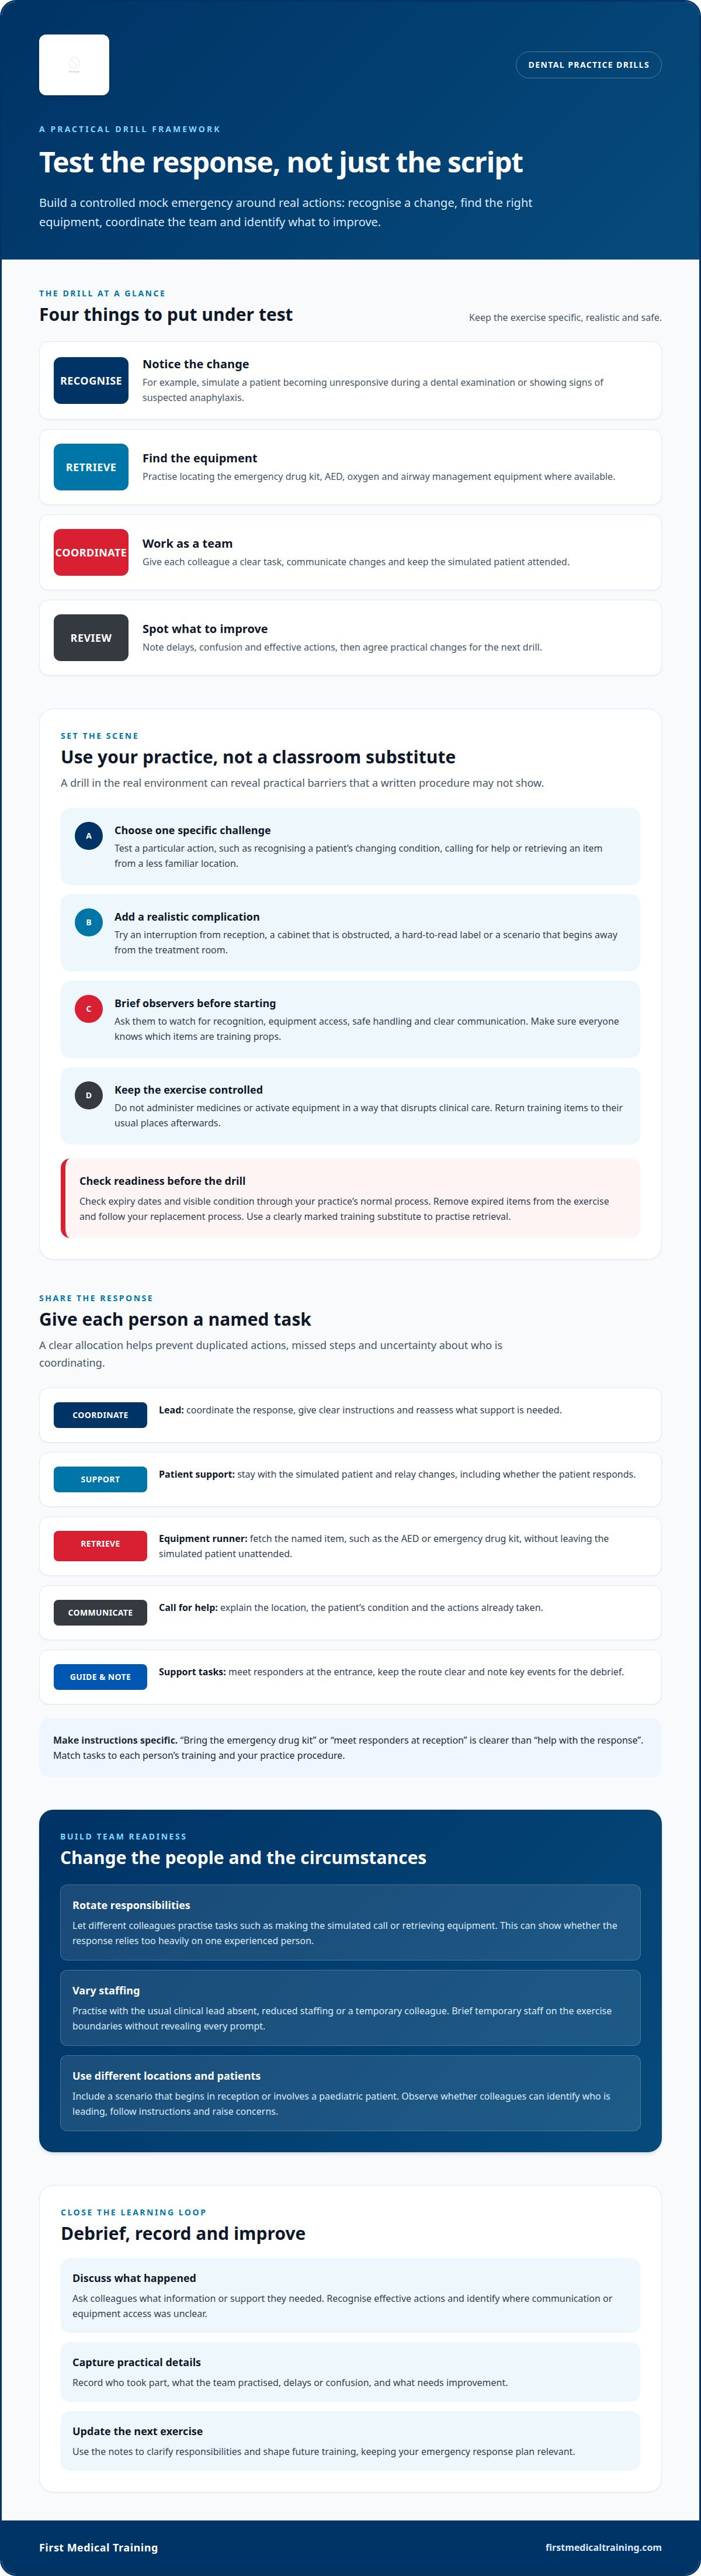
Run drills for anaphylaxis, seizure and sudden collapse, including suspected cardiac arrest. Each exercise should test recognition, role allocation, access to emergency equipment, summoning help, ambulance access and handover.
Start with one clear scenario and a defined learning aim. For an anaphylaxis drill, have a patient develop worsening symptoms during routine treatment. Observe whether you recognise the change, retrieve the appropriate emergency medicines, call for emergency help and communicate as the patient’s condition changes. Keep medicines simulated and the exercise safe for patients receiving actual care nearby.
Give the team information in stages instead of explaining the whole scenario at once. A role-player can first report feeling unwell, then become less responsive. As the lead, direct an assessment and adapt the response to new observations. Ask another team member to communicate the change, retrieve equipment and prepare a clear handover.
A seizure scenario can begin during a routine appointment. Stop treatment immediately. Move sharp instruments away from the patient’s mouth and place soft objects around the head to help prevent injury. After convulsions subside, assess airway, breathing and circulation, administer oxygen via a mask, and monitor vital signs. Include a handover describing the event’s sequence and observed symptoms.
Test the whole route to help, not just actions beside the dental chair. Ask the receptionist to summon emergency services and provide the location. Assign another team member to meet responders at the entrance and guide them to the patient. Check whether you can maintain communication and give an accurate account without obstructing access.
Keep the drill controlled. Tell participants how the exercise ends, appoint an observer, and make clear that real emergencies take priority. Ask the observer to note specific actions, such as whether you recognised deterioration, followed the dental emergency response plan and communicated effectively. Avoid judging performance against an invented time target; focus on whether each action was appropriate and coordinated.
Debrief promptly with everyone involved. Ask what helped, where instructions were unclear and what should change. Record strengths, gaps and agreed follow-up actions, then use those findings to shape the next exercise. Include all team members in the drill programme, and vary the scenario, location or staffing so practice reflects different situations rather than repeating a script.
First Medical Training: Medical Emergencies in a Dental Practice Course
First Medical Training Ltd’s Medical Emergencies in a Dental Practice course is a relevant next step when your team needs structured learning alongside practice drills. It helps dental staff develop their understanding of medical emergencies and the actions involved in a coordinated response.
Consider this course when drill debriefs reveal gaps in recognition, communication or confidence with emergency procedures. If your team needs a stronger focus on immediate life support, Dental Immediate Life Support (ILS) Training may be relevant. Choose training that addresses the learning needs identified in your practice, then use future drills to practise applying that learning in your own response.
To discuss training for your dental team, contact First Medical Training Ltd.
Turn your drill findings into a training plan
Let each exercise guide your team’s next development step. Decide whether the priority is practising emergency procedures, strengthening immediate life support skills or building wider first-aid knowledge. Knowing how to run mock emergency drills in a dental practice also means using each debrief to shape the next learning goal.
First Medical Training offers a Medical Emergencies in a Dental Practice Course, Dental Immediate Life Support (ILS) Training, and an Emergency First Aid at Work Course (EFAW) - 1 Day. Match training to the skills your team wants to develop, then review how to run mock emergency drills in a dental practice to practise applying that learning.
Take the next step by discussing your team’s training needs. Contact First Medical Training to explore suitable training for your practice and support your team’s continued readiness.
Frequently Asked Questions
What makes a useful dental emergency scenario?
A useful scenario has a clear trigger, realistic developments and a learning aim observers can assess. For example, test whether staff notice a patient’s condition changing after an initially routine appointment, rather than giving them the diagnosis at the outset. Give the team enough information to act, then introduce a new detail that requires reassessment. Keep the exercise simulated, safe and relevant to your practice procedures.
How often should dental practices practise medical emergency drills in the UK?
Schedule ongoing practice, with a monthly drill or emergency-training review as a practical routine. Emergency skills should be reviewed at least annually, and preferably more often. Use the monthly discussion to identify a focused learning need, then plan a drill around it. For example, if staff struggle to communicate observations clearly, make structured handover the focus of the next exercise.
How do you run a dental practice medical emergency simulation step by step?
Choose a scenario and learning aim, brief an observer, and tell staff the exercise is simulated. Start with a simple prompt, then introduce changes in the patient’s condition. Let the team follow its dental emergency response plan while the observer records actions and communication. Stop the exercise safely, then debrief: identify what worked, agree on a specific improvement and decide how to review it.
How should you assign staff roles during a dental emergency drill?
Name a lead responder and give each participant a distinct task before the scenario begins. For example, one person coordinates the response, another supports the patient, and a colleague makes the simulated emergency call. Assign someone to communicate with responders and guide them through the building. Rotate roles in later drills so the team can practise if its usual lead or another key member is absent.
How do you assess and record dental emergency drills and create an action plan?
Assess observable actions against the practice procedure, such as whether staff recognised the scenario, communicated clearly and completed their assigned tasks. Record strengths and gaps, then turn each gap into an action with a named owner and review point. For instance, if staff give an incomplete handover, plan a focused communication exercise and revisit the issue during the next training review.
Which emergency scenarios should dental teams practise, including anaphylaxis, cardiac arrest and syncope?
Include anaphylaxis, suspected cardiac arrest and syncope, alongside seizures and a patient becoming less responsive during treatment. Vary where the event begins, such as in the surgery or reception, and whether the usual clinical lead is present. An anaphylaxis exercise can test recognition, access to emergency medicines, a simulated 999 call and communication as symptoms change. Follow your practice protocol during each scenario.
What are the risks and common mistakes in dental emergency drills?
Common mistakes include making the scenario too predictable, leaving participants unsure whether it is real, and allowing several people to assume someone else will act. A drill can also disrupt clinical care if its boundaries are unclear. Tell participants how to stop the exercise, protect uninvolved patients and use simulated medicines only. Keep feedback focused on actions and process, not personal blame.