The Recovery Position: A Step-by-Step Guide for First Aid and Dental Teams

What if the most critical action you take during a medical emergency isn't performing chest compressions, but simply ensuring a patient can continue to breathe? For many dental professionals and workplace first aiders, the sight of an unconscious casualty brings an immediate wave of anxiety. You might worry about the risk of causing further injury or feel unsure whether the recovery position is the correct protocol to follow. It's a common concern, especially when the pressure to act quickly and correctly is at its highest.
We understand that maintaining your clinical skills is about more than just ticking a compliance box; it's about the safety of those in your care. This guide provides a clear, authoritative path to mastering the recovery position, ensuring you can manage an unconscious casualty with steady reliability whilst maintaining airway patency. We'll explore the latest IFRC 2025 guidelines, provide a step-by-step walkthrough for different scenarios, and clarify how this essential technique bridges the gap between a crisis and professional emergency intervention. By the end, you'll have the practical knowledge to meet GDC standards and protect your patients with confidence.
Key Takeaways
- Learn to distinguish between the need for chest compressions and the correct application of the recovery position for casualties who are unconscious but breathing normally.
- Master a methodical, step-by-step technique to safely position a patient, ensuring their airway remains patent and protected from physical obstruction.
- Discover vital modifications for high-risk scenarios, including specific protocols for managing pregnant patients and suspected spinal injuries without compromising safety.
- Understand the clinical science behind airway protection and how lateral positioning prevents aspiration by facilitating the natural drainage of fluids.
- Ensure your practice meets GDC compliance standards for annual verifiable CPD by mastering these essential medical emergency protocols.
What is the Recovery Position and When is it Used?
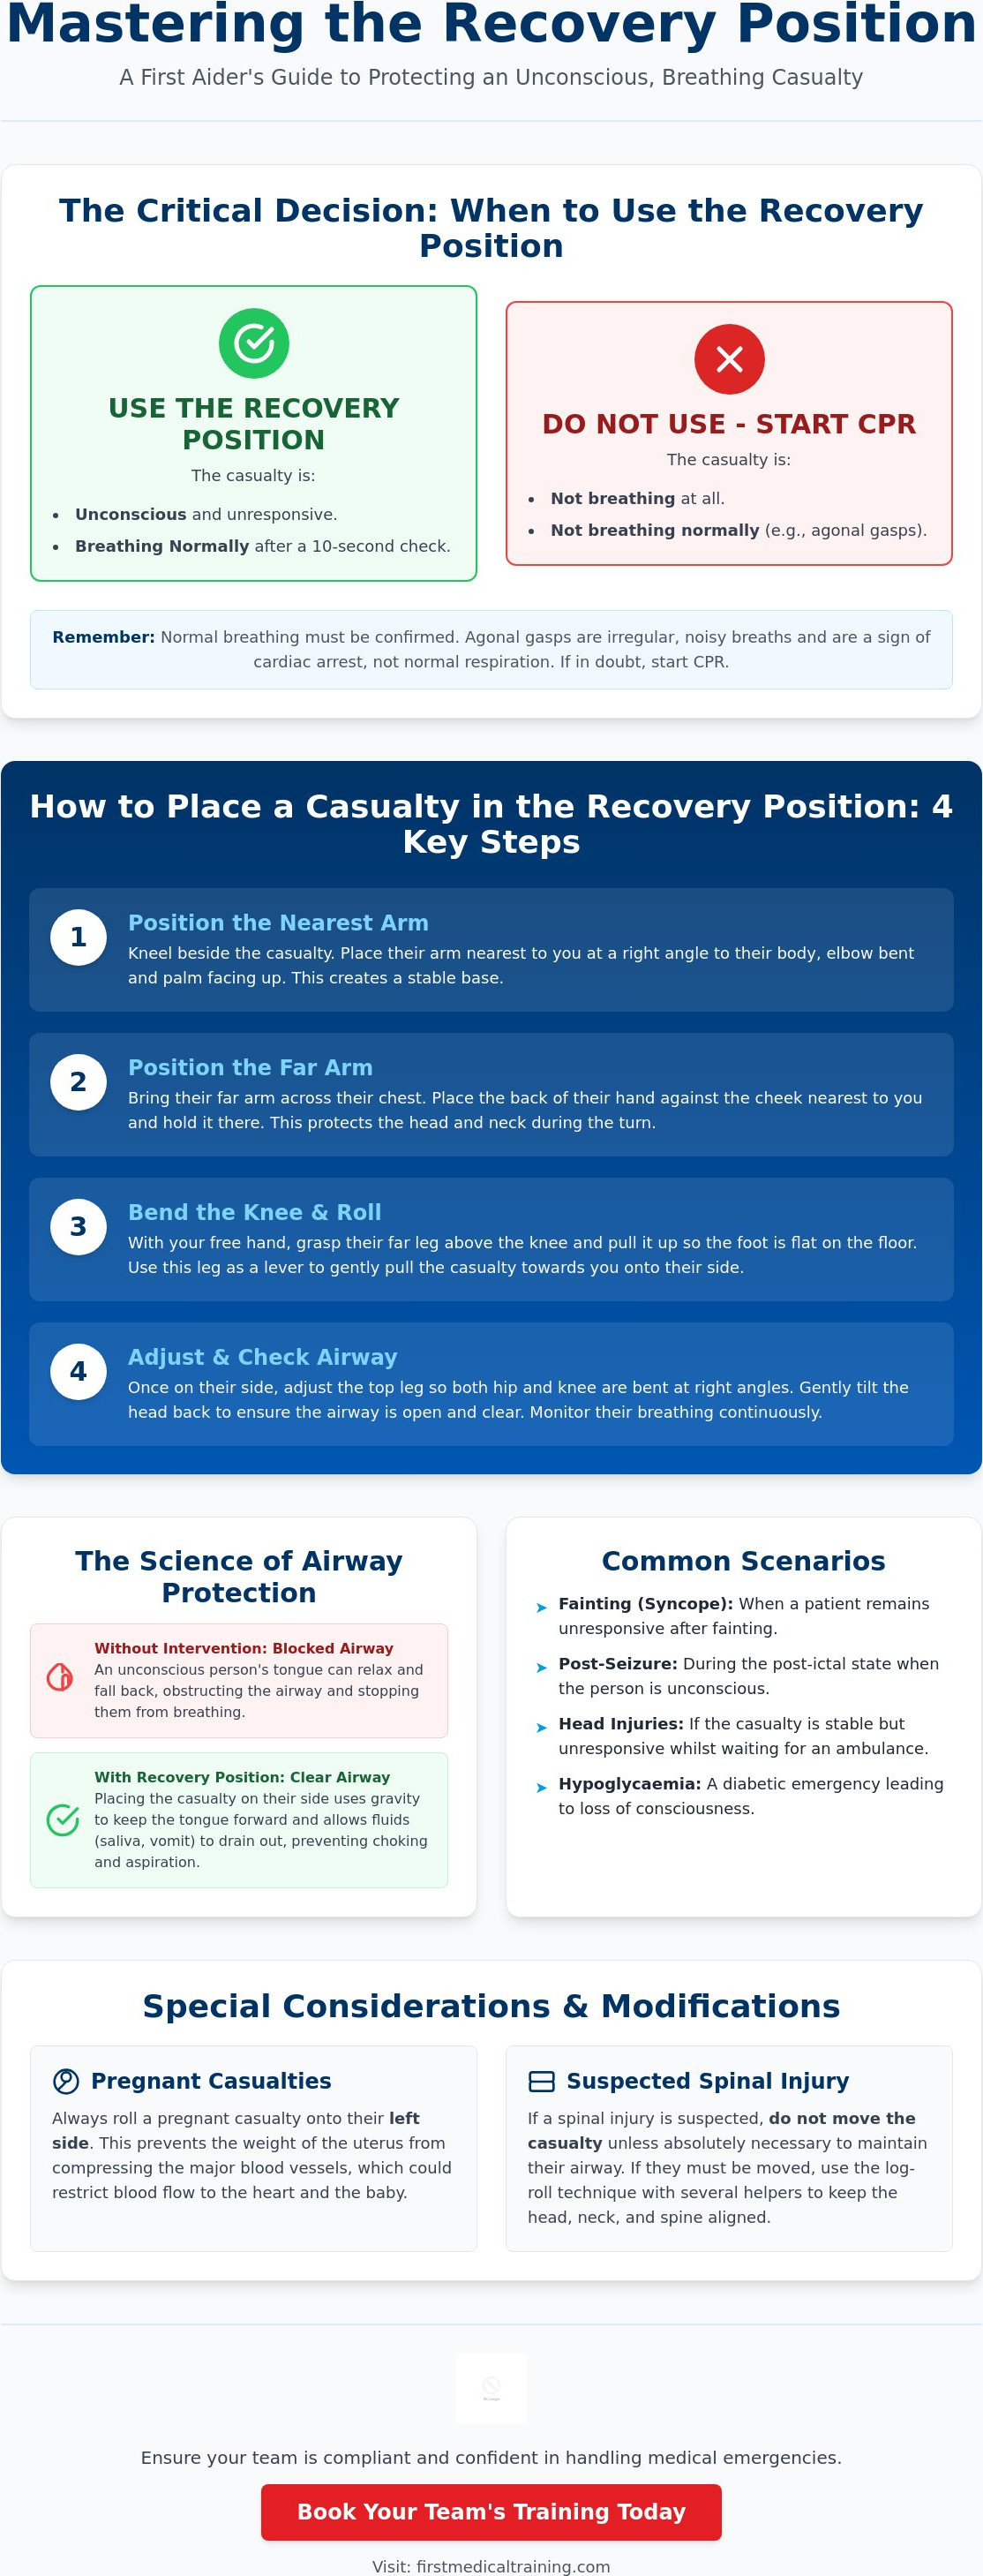
The recovery position is a specific lateral recumbent posture designed to maintain a clear airway in individuals who are unconscious but still breathing normally. It's a fundamental skill taught in every emergency first aid at work 1 day course, acting as a vital safeguard until professional medical help arrives. When a person loses consciousness, their muscles relax, including the tongue. Without intervention, the tongue can fall back into the pharynx, creating a physical obstruction that leads to asphyxiation. By placing the casualty on their side, gravity keeps the airway open and allows fluids like saliva or vomit to drain away safely. This protects the lungs from aspiration, a serious complication where foreign material enters the trachea and causes internal damage.
The Vital Assessment: Breathing vs. Non-Breathing
Before you move a casualty, you must be certain of their clinical status. The golden rule is simple: the recovery position is only for those who are unconscious and breathing normally. You should check for respiration by looking for chest movement, listening for breath sounds, and feeling for air against your cheek for a full 10 seconds. It's vital to differentiate between normal breathing and agonal gasps. Agonal gasps are irregular, noisy, or infrequent breaths often seen in the early stages of cardiac arrest. They aren't effective respiration. If the casualty isn't breathing normally, you must start CPR immediately. Placing a non-breathing person on their side is a dangerous mistake, as it delays life-saving chest compressions and the essential use of an AED.
Medical Scenarios Requiring the Recovery Position
Several clinical situations in a dental practice or workplace might require this intervention. Vasovagal syncope (fainting) is common, and whilst most patients recover quickly, those who remain unresponsive need immediate airway protection. It's also essential during the post-ictal state following a seizure, where the patient is unconscious and may have excess saliva or blood in their mouth. Other scenarios include:
- Severe hypoglycaemia leading to a loss of consciousness.
- Managing a patient who has collapsed due to drug or alcohol-induced unconsciousness, where the risk of vomiting is particularly high.
- Head injuries where the casualty is stable but remains unresponsive whilst awaiting the ambulance.
- Situations where you're the sole responder and need to leave the casualty to call for emergency services.
This structured approach ensures that you're prepared for the practical realities of a crisis. It bridges the gap between identifying a medical emergency and providing a professional, life-saving solution that keeps the patient safe until paramedics take over.
How to Put Someone into the Recovery Position: Step-by-Step
Once you've confirmed the casualty is unconscious and breathing, you must act with precision. Before moving them, check for immediate hazards and prepare the body for the turn. Remove spectacles to prevent facial injury and check pockets for sharp objects like keys or pens. These items can cause significant bruising or puncture wounds when the casualty's weight shifts during the roll. Taking these small steps ensures you don't cause secondary injuries whilst managing the primary emergency.
Follow these four steps to achieve a stable position:
- Step 1: Kneel beside the casualty. Take the arm nearest to you and place it at a right angle to their body. The elbow should be bent with the palm facing upwards. This creates a secure anchor point for the rest of the movement.
- Step 2: Take their far arm and bring it across their chest. Place the back of their hand against the cheek nearest to you. Hold it there; this hand acts as a cushion and supports the head once they're turned.
- Step 3: With your free hand, grasp the far leg just above the knee and pull it up so the foot is flat on the floor. Use this leg as a lever to gently pull the casualty towards you onto their side.
- Step 4: Once they're on their side, perform a gentle head tilt to ensure the airway remains open. This is the final, critical check of the recovery position.
Refining the Technique for Stability
Stability is essential to prevent the casualty from rolling onto their stomach, which could compromise their breathing. Adjust the upper leg so both the hip and knee are bent at right angles. This "kickstand" effect provides the necessary balance to keep them securely on their side. Ensure the casualty's hand stays tucked firmly under their cheek; this maintains the head tilt and keeps the airway patent without requiring you to hold it manually.
Ongoing Monitoring Protocols
Your responsibility continues until professional help arrives. Continuously monitor their breathing rate and skin colour. If their lips or fingernails turn blue, they may not be getting enough oxygen. If the casualty starts to vomit, the lateral position allows the fluid to drain; you might need to clear the mouth quickly whilst maintaining the head tilt. To prevent nerve damage or circulation issues, follow the 30-minute rule: if help hasn't arrived, roll them onto their opposite side. Mastering these nuances is a core part of our Emergency First Aid at Work Course, where we practise these skills in real-world scenarios to build your confidence.
The Science of Airway Protection: Why it Works
Understanding the mechanical advantages of the recovery position requires a look at human anatomy under the effects of unconsciousness. When a person loses consciousness, they experience a total loss of muscle tone, known as hypotonia. In a supine position (lying on the back), this relaxation causes the tongue, which is a significant muscle mass, to succumb to gravity and collapse against the back of the pharynx. This creates a physical seal over the airway. By transitioning a casualty into a lateral recumbent posture, you use gravity as an ally rather than an opponent. The tongue falls forward, away from the posterior pharynx, ensuring a clear path for oxygen to reach the lungs.
Beyond simple obstruction, the lateral position is a critical defence against aspiration. In an unconscious state, protective reflexes like swallowing and coughing are often absent. If the casualty vomits or has a build-up of saliva or blood, these fluids pool in the throat. If they are on their back, these substances will inevitably drain into the trachea and enter the lungs. This leads to aspiration pneumonia, a life-threatening inflammatory condition caused by stomach acid and bacteria entering the pulmonary system. The lateral tilt ensures the mouth is the lowest point of the upper airway, allowing fluids to drain externally rather than internally.
Anatomy of an Unconscious Airway
The transition to the side does more than just move the tongue. It facilitates a natural "Head Tilt, Chin Lift" without the need for constant manual intervention. When you place the casualty's hand under their cheek, it provides a stable pivot point that keeps the neck slightly extended. This extension pulls the epiglottis away from the glottic opening, the entrance to the vocal cords and trachea. Unlike leaving a casualty supine, where the soft palate and epiglottis can easily occlude the airway, the lateral position keeps these structures in a neutral, open alignment.
Physiological Benefits for Respiratory Effort
Respiratory efficiency is significantly improved when a casualty is correctly positioned. Lying flat on the back places the weight of the chest wall and the abdominal contents directly onto the lungs and diaphragm. This increases the "work of breathing," which can be exhausting for a compromised patient. On the side, this pressure is relieved, allowing for maximum thoracic expansion and unimpeded diaphragmatic movement. It's vital during this time to monitor for agonal breathing. These are infrequent, noisy gasps that often mimic breathing but are actually a sign of cardiac arrest. If you detect this shift in respiratory behaviour, you must immediately return the patient to their back and begin resuscitation protocols.
Special Considerations: Spinal Injuries, Pregnancy, and Infants
Standard protocols provide a reliable framework for most emergencies, but certain casualties require a more nuanced response to ensure their safety. The recovery position must be adapted when you encounter suspected spinal trauma, advanced pregnancy, or infants. These scenarios often cause the most anxiety for responders, yet the underlying principle remains unchanged: an open airway is the absolute priority. If you cannot maintain a patent airway in the position the casualty was found, you must move them, regardless of other potential injuries.
Suspected Spinal Cord Injury
If a casualty has fallen from height or been involved in a high-impact collision, you should suspect a spinal injury. In these cases, the traditional head tilt, chin lift technique can be dangerous. Professional responders often use the "Jaw Thrust" as an alternative; this involves placing your fingers behind the angles of the lower jaw and pushing it forward without tilting the head back. If the casualty is breathing normally and their airway is clear, leave them exactly as they are whilst keeping their head still. However, if they start to vomit or their breathing becomes compromised, you must turn them. If you have enough people, use the "Log Roll" technique to keep the head, neck, and spine in a straight line during the transition to their side.
Pregnancy and the Recovery Position
When managing an unconscious expectant mother, the side you choose is a clinical decision. You must always place a pregnant casualty on their left side. This is because the weight of the uterus can compress the inferior vena cava, a major vein, when she lies on her back or her right side. This compression, known as aortocaval compression, significantly reduces blood flow to the heart and the placenta. If a left-lateral tilt is not possible due to other injuries, use rolled blankets or cushions to prop up her right hip. These specific protocols are a critical component of our training for medical emergencies in dental practice, where clinical safety and maternal health must be balanced perfectly.
Managing Infants
The standard technique is not suitable for infants under one year old. Instead, you should hold the infant on their side in your arms, ensuring their head is tilted slightly downwards. This position uses gravity to help clear any obstructions or fluids from the airway whilst providing the physical support their smaller frame requires. Never leave an infant alone in this position; continuous monitoring is essential until paramedics arrive.
Understanding these variations ensures you can act with steady reliability in any crisis. To ensure your entire team is prepared for these complex scenarios, consider booking our Medical Emergencies in a Dental Practice Course to gain hands-on experience with these life-saving adaptations.
Professional Training and Compliance for Dental Teams
Mastering the recovery position is more than a clinical skill; it's a regulatory necessity. In a dental environment, where patients may be anxious, sedated, or undergoing complex procedures, the risk of a medical emergency is a constant reality. Relying on theoretical knowledge isn't enough when a patient collapses in your waiting room or surgery. You need a team that can transition from routine care to emergency response without hesitation. This level of readiness is only achieved through structured, hands-on training that reflects the unique challenges of the dental practice.
For an example of a patient-focused practice that maintains these rigorous safety standards, you can visit 7 Pearls Dental.
Meeting GDC CPD Standards
The General Dental Council (GDC) identifies medical emergencies as a highly recommended topic for continuing professional development. To meet these standards, dental professionals should complete at least 10 hours of medical emergencies training in every five-year CPD cycle. First Medical Training provides accredited, verifiable certificates that ensure your practice remains compliant. It's essential that this training isn't restricted to clinical staff. Receptionists and practice managers are often the first to witness a collapse in the communal areas. Ensuring every team member can confidently check for breathing and place a casualty in the recovery position creates a robust safety net for your patients.
Practical Drills for the Dental Surgery
Training shouldn't be a solitary exercise completed behind a computer screen. In-practice team training is superior because it allows you to rehearse in the actual environment where an emergency will occur. Simulating a patient collapse in the dental chair presents different physical challenges than a collapse on a flat floor. You must decide whether to treat the patient in the chair or move them to the ground to maintain an open airway. Regular "mock" emergencies build the muscle memory required to act under pressure. These drills are a core part of dental practice emergency preparedness, allowing you to test your team's communication and the accessibility of your emergency kit.
Designating a "First Aid Lead" within the practice helps to maintain these standards. This individual ensures that oxygen cylinders are full, AED pads are in date, and that the team's skills in cardiac arrest management in dental practice remain sharp. By integrating the recovery position into your wider emergency protocols, you move beyond mere compliance. You create a culture of safety that protects your patients and provides your team with the quiet confidence of seasoned experts.
Beyond immediate first aid response, maintaining a safe workplace often involves proactive health oversight. Specialist providers such as Persona Health offer essential occupational medical assessments, ensuring that personnel are physically fit for their specific duties and contributing to a safer environment for all.
Strengthening Your Practice's Emergency Response
Mastering the recovery position ensures that your team can act with steady reliability when seconds count. By understanding the anatomical necessity of lateral positioning and the specific needs of vulnerable casualties, you move beyond basic compliance to true clinical competence. This knowledge protects your patients from the risks of aspiration and airway obstruction whilst they await professional intervention. It bridges the gap between identifying a crisis and delivering a safe, effective solution.
First Medical Training has been a trusted partner in medical education since 2006. With over 20 years of expertise, we deliver GDC-compliant, verifiable CPD for the entire dental team nationally across the UK. You can book your accredited Medical Emergencies in a Dental Practice Course today to build the practical skills your practice deserves. We help you demystify complex procedures and replace anxiety with the quiet confidence of a seasoned responder. Your commitment to high standards of care ensures that when a crisis occurs, you are ready to lead with precision and heart.
Frequently Asked Questions
Can I put someone in the recovery position if I suspect a neck injury?
You should only move a casualty with a suspected neck injury if it's absolutely necessary to maintain a patent airway. Whilst spinal stability is a major concern, an obstructed airway is an immediate threat to life. If they are vomiting or struggling to breathe, use the log roll technique with the help of others to keep the head, neck, and spine aligned throughout the turn.
What is the main purpose of the recovery position?
The primary purpose of this technique is to maintain an open airway in an unconscious casualty who is breathing normally. It prevents the tongue from falling back and obstructing the pharynx. Additionally, the lateral tilt allows fluids like vomit or saliva to drain from the mouth, which significantly reduces the risk of aspiration pneumonia or choking whilst awaiting professional medical assistance.
How long can someone stay in the recovery position?
A casualty can stay in this position until paramedics arrive, but you should roll them onto their opposite side every 30 minutes. This 30-minute rule is essential for relieving pressure on the lower arm and preventing potential nerve damage or circulation issues. Always ensure the airway remains open and monitor their breathing rate continuously throughout the transition to the other side.
Is the recovery position different for children and infants?
The procedure for children is identical to that for adults, but the technique for infants under one year old is significantly different. You should hold an infant on their side in your arms with their head tilted slightly downwards. This modified position prevents the tongue from blocking the airway and allows fluids to drain safely without placing undue pressure on their smaller chest and abdomen.
Which side should a pregnant woman be placed in the recovery position?
A pregnant woman should always be placed on her left side to avoid aortocaval compression. Lying on the right side or back allows the weight of the uterus to compress the inferior vena cava, which reduces blood flow to the heart and placenta. If injuries prevent left-side positioning, use rolled towels or cushions to tilt her right hip upwards by at least 15 degrees.
What should I do if the casualty stops breathing whilst in the recovery position?
If the casualty stops breathing or their respiration becomes irregular, you must immediately roll them onto their back and begin CPR. The recovery position is only suitable for those with effective, normal breathing. Call emergency services right away if you haven't already done so, and utilise an Automated External Defibrillator (AED) as soon as it becomes available to support resuscitation efforts.
Do I need to tilt the head back in the recovery position?
Yes, a gentle head tilt is a critical final step once the casualty is on their side. This extension of the neck pulls the tongue and epiglottis away from the back of the throat, ensuring the airway remains patent. You should use the casualty's hand under their cheek to support this tilt, providing a stable position that maintains an open airway without constant manual intervention.
Is the recovery position part of GDC medical emergencies training?
Airway management and the recovery position are fundamental components of GDC-compliant medical emergencies training. Dental professionals are required to undertake annual verifiable CPD in this area to ensure they can manage a collapsed patient safely. Our courses cover these practical skills in detail, ensuring your entire team meets the necessary standards for workplace safety and clinical compliance.